Data Analytics
How does your bank measure the success of your digital marketing efforts?
If you are like most bank executives, your marketing team or agency partner probably provide you with copious reporting information on a quarterly or annual basis. They are proud to show reports pulled from Google Analytics and other tools to show how your website traffic has increased, the growth of your social media audience, and how much they’re spending on digital, print or other traditional forms of advertisement.
The truth is, without comprehensive conversion tracking in place, all of these are essentially vanity metrics.
Conversion tracking goes by many names – including goal tracking or lead tracking – and refers to the practice of using digital reporting tools like Google Tag Manager and Google Analytics to tag whenever a user performs specific actions on your website. These actions indicate a user’s intent to contact the bank or convert to a lead. This shows the true value of your marketing efforts and allows you to adjust your marketing strategies accordingly to improve conversions.
Many banks do not actively use conversion tracking strategies, mostly because they can be difficult and time-consuming to initially configure. However, this effort pays off in the long run by providing an ongoing source of actionable data for all of your marketing avenues that connect to your website. And since your website is the greatest marketing tool for your bank, it is essential to begin collecting this tracking information as soon as possible.
The value of effective conversion tracking cannot be underestimated, and it’s past time to begin monitoring conversions that are occurring on your bank or credit union website. Here are some tips to help you get started:
Identifying High-Value Goals
Before you get started with any of the technical setup required to track goals, it’s important to first choose the goals on your website that you would like to track. Since all bank websites are different, your goals may be unique to your site and your marketing goals. However, here are a few common goals that every bank should be tracking if they have the means to do so:
- Email clicks
- Click-to-call phone numbers for mobile devices
- Online account opening platforms visits; you might even want to differentiate between clicks to personal and business accounts
- Online loan application clicks; if you have multiple applications for various loan products, these can be tracked individually
- Contact form submissions; you can track forms individually to gather data about each one
- Clicks to get directions from a map API on your website, such as Google Maps
Generally, you want to identify goals that show some intent for your users to become a lead. You don’t need to track every action they take on your website, just the actions that you want them to take that will set them on the road to becoming a customer or contacting the bank. You may choose to track other generic goals, but you should prioritize setting up these high-value goals first.
Open a spreadsheet and begin cataloging the goals that you would like to track across your website. Simply browse the site and look for actions that you consider display an intent to become a customer or contact the bank. This will help you stay organized and make it easier to remember which goals you will need to set up in Google Tag Manager.
You won’t need to set up tracking for broad goals individually. For example, if you want to track all clicks-to-call every phone number on your site, you only need to set up a single goal to track phone clicks. If, however, you want to track clicks to a specific phone number, you can set this up as a separate goal.
Setting up Google Analytics
If you’re like most banks, you’re already leveraging Google Analytics in some capacity to collect data about your website’s usage. You might even have a few simple goals already set up solely through Analytics, such as visits to landing pages that are only accessible by filling out a form on the site. Configuring Analytics is your first step towards conversion tracking.
You will likely need the assistance of your web team to install Analytics on your website, which requires implementing a code snippet on the back end of your website that allows Google to collect data. Google provides fairly simple step-by-step instructions to help you get started with this platform. Once the code is installed, you will be able to see basic user data on the Home tab of Analytics when you are logged in.
Once the tracking code has been installed, you will need your Analytics ID number for the next step of the process. To find this, navigate to the Admin page, click Tracking Info and Tracking Code. Take note of the Tracking ID in the top-left of this page.
You will be coming back to Analytics later in the tracking setup process. Once you have configured your goals in Google Tag Manager, you will set up these goals in Analytics as well so that you can track conversions in your reporting.
Setting up Google Tag Manager
Thankfully, Google provides instructions to help you get started in Tag Manager. Follow these guidelines to create the account using the same Google account that was used to configure your Analytics. Once this is complete, you will be assigned a tracking code that will allow you to install Tag Manager on your website, just like you did with Analytics. You may want to request that your web team install this tracking code for you along with the Analytics code. Once you are logged in to your account, click the blue tracking ID in the top-right of the page; this will provide you with the code and installation instructions.
Creating Analytics Variable
In order to help your Analytics and Tag Manager accounts communicate, you will need to establish a variable in Tag Manager using your Account ID from Analytics. You can follow these steps to accomplish this:
- Login to Tag Manager and click the Variables tab on the left panel.
- At the bottom of this page, add a new User-Defined Variable.
- Name the variable whatever you’d like. You may want the name to indicate that it is related to your Google Analytics account. For example, “First National Bank Analytics Variable.”
- For the Variable Type, select the Google Analytics Settings
- In the Tracking ID section, simply paste your Tracking ID from Google Analytics. This ID always starts with “UA-” followed by a series of numbers. To find this information, login to Analytics, navigate to the Admin section, click the Tracking Info tab and finally the Tracking Code tab. Your Tracking ID will be in the top-left of this page.
- Now Save the variable, and you’re done with this step.
Creating a Page View Tag
Once this code is installed, you will need to set up a simple tracking goal, called a Page View tag, that enables Tag Manager to run on every page of your website. This is the cornerstone of the tracking process and must be done before you can set up any specific goal tracking. Here are step-by-step instructions to help you configure this important tag:
- Login to Tag Manager and click the Tags tab on the left panel.
- Add a New tag and name it something to indicate that this is your Page View tag. For example, “Google Analytics Page Views.”
- For the Tag Type, choose the Google Analytics: Universal Analytics
- In the Track Type box, choose the Page View
- For the Google Analytics Setting dropdown box, simply select the Variable you created earlier
- In the Firing Triggering section, select the All Pages option.
- Simply Save the tag and you are done with this step.
Tracking in Tag Manager
Now that the initial footwork is done, it’s time to dig into setting up your goal tracking. As mentioned above, the types of goals that can be tracked are various and methods of configuring your goal tracking may be different depending on how your website is set up. This article will cover two important goals that most banks will find helpful.
Keep in mind that you can only track goals that are occurring on a URL that you own. So, once someone clicks a link that leads to another website – including loan application and account opening portals – you will not be able to track what these users are doing once they have left your website. You will, however, know how many people have clicked these links, which provides a wealth of information. You can even consult with your lending team to determine how many completed applications they received through the application portal, and compare these to your Tag Manager goals to understand how many of these users followed through the entire application process.
Here are a few simple goals that you can set up that will allow you to track conversions. This should provide you with a basic understanding of how the setup process works, so that you can attempt different configurations on your own:
Phone Call Tracking
This configuration will allow you to track each time a phone number is clicked on your website. In order for this to work, your phone numbers must be linked, which is a best practice to support mobile devices.
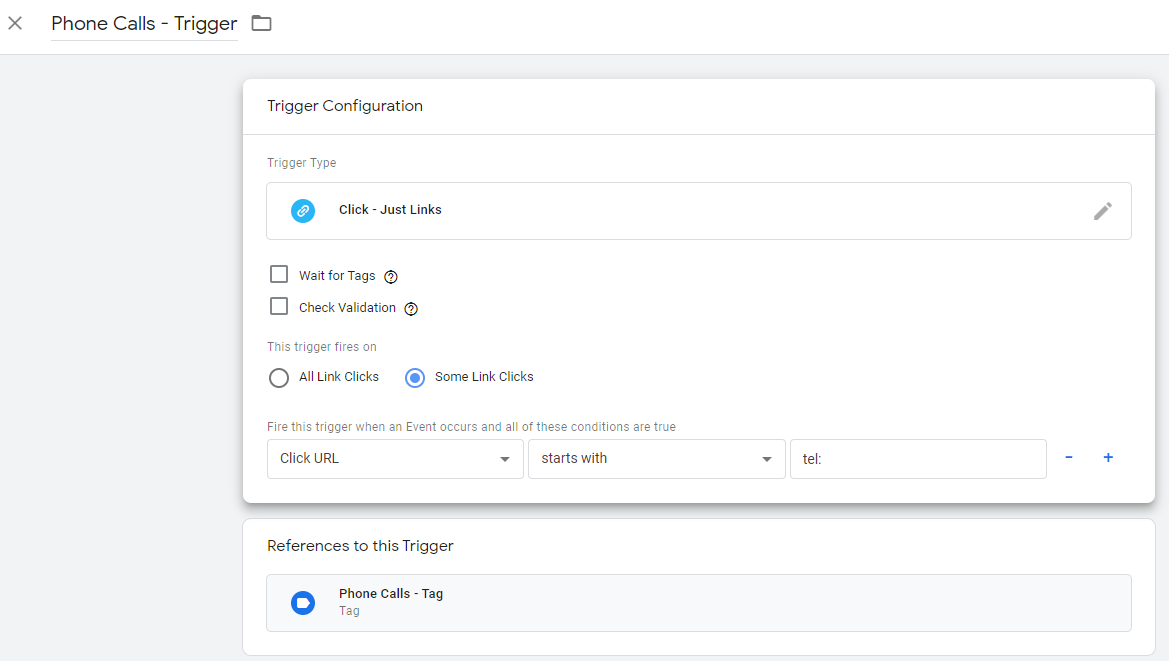
- In your Tag Manager account, click the Triggers tab on the left panel and select the New button to add a new trigger.
- Name your trigger. For the Trigger Type, select “Click – Just Links.”
- Choose for the trigger to fire on Some Link Clicks.
- You’ll now need to tell Tag Manager when you’d like this goal to trigger. In the first dropdown, select “Click URL.” In the second dropdown, select “starts with.” In the final box, enter the text tel:
- “tel:” is a piece of code that precedes every linked phone number on your website. The above configuration is essentially telling Tag Manager to track whenever a URL is clicked that contains the tel: text, which will be every phone number on your website.
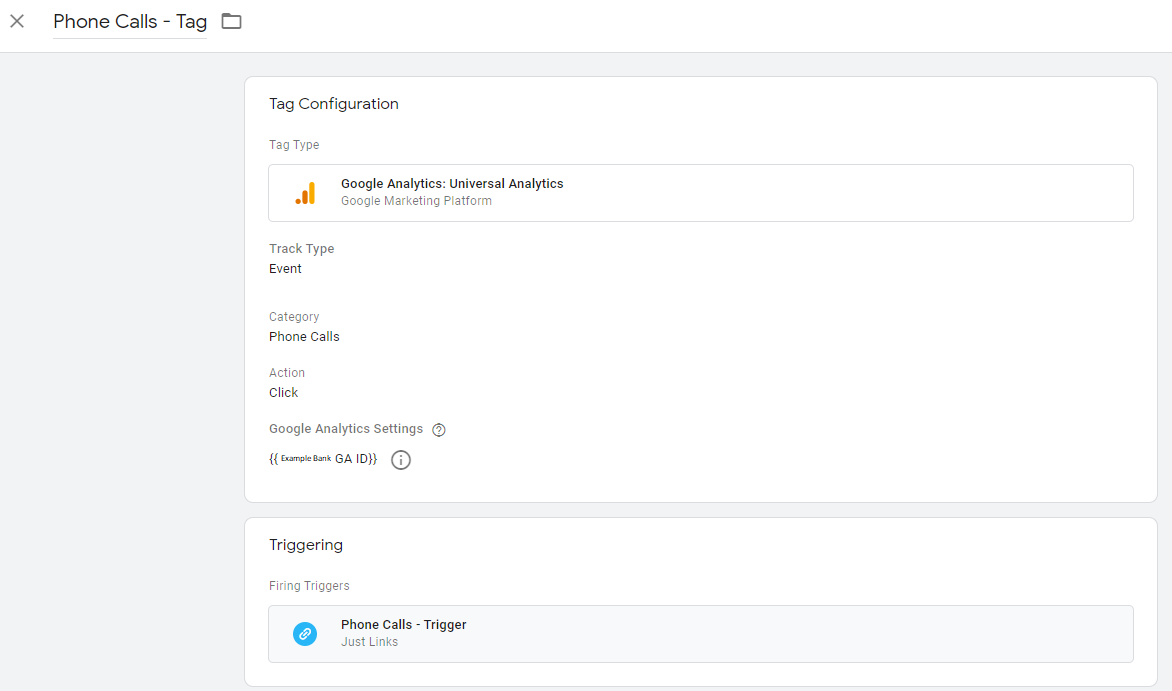
- Save your trigger and navigate to the Tags tab. Create a new Tag.
- Name your tag. For the Tag Type, select Google Analytics: Universal Analytics.
- You’ll now configure the tag so that it can track in Analytics. For the Track Type, choose Event from the dropdown menu. For the Category, enter the text “Phone Calls” and for the Action, enter the text “Click.” Finally, in the Google Analytics Settings dropdown, choose the Analytics Variable that you created in a previous section. Save your Tag.
- At this point, you may choose to use Tag Manager’s Preview capability to test the goal you’ve just set up. Check out some more information about Preview Mode here.
- Open the corresponding Google Analytics account, and navigate to Admin > Goals. Choose to create a new goal.
- In the Goal Setup menu, select the Custom button and click Continue. In the Goal Description menu, enter a name for your Goal and select the Event button. In the Goal Details menu, enter the Category and Action that you chose for the Tag; in this case, the Category is “Phone Calls” and the Action is “Click.” These must match exactly what you have entered in the corresponding tab. Save the goal, and you’re done!
- You should now be able to see each time a phone number is clicked on your website in the Goals Overview section of Analytics.
Account Opening & Application Tracking
If you have online account opening or online applications available on your site, this tracking configuration will allow you to see how many of your visitors clicked these links. Again, Tag Manager will only allow you to track what happens on your website, so we cannot see what happens to these users once they click to an application portal. However, tracking this user data should provide you with some insight into user engagement on the site.
- In your Tag Manager account, click the Triggers tab on the left panel and select the New button to add a new trigger.
- Name your trigger. For the Trigger Type, select “Click – Just Links.”
- Choose for the trigger to fire on Some Link Clicks.
- You’ll now need to tell Tag Manager when you’d like this goal to trigger. In the first dropdown, select “Click URL.” In the second dropdown, select “starts with.” In the final box, paste the URL of the link that points to offsite to your online application or account opening portal.
- Save your trigger and navigate to the Tags tab. Create a new Tag.
- Name your tag. For the Tag Type, select Google Analytics: Universal Analytics.
- You’ll now configure the tag so that it can track in Analytics. For the Track Type, choose Event from the dropdown menu. For the Category, enter the text “Application Clicks” and for the Action, enter the text “Click.” Finally, in the Google Analytics Settings dropdown, choose the Analytics Variable that you created in a previous section. Save your Tag.
- Again, this is a good time to use Tag Manager’s Preview capability to test the goal you’ve just set up. Check out some more information about Preview Mode here.
- Open the corresponding Google Analytics account, and navigate to Admin > Goals. Choose to create a new goal.
- In the Goal Setup menu, select the Custom button and click Continue. In the Goal Description menu, enter a name for your Goal and select the Event button. In the Goal Details menu, enter the Category and Action that you chose for the Tag; in this case, the Category is “Application Clicks” and the Action is “Click.” These must match exactly what you have entered in the corresponding tab. Save the goal, and you’re done!
- You should now be able to see each time a phone number is clicked on your website in the Goals Overview section of Analytics.
It is important to note that the above configuration will not work for every site. You may need to experiment with different configurations of the Trigger using Tag Manager’s Preview Mode to determine how to set up this trigger for your site.
Track Goals Across Multiple Platforms
If you are using Google Ads as a digital marketing platform, there is one final step you should take in order to track these goals through your Ads account. This will provide you with more insightful reporting about the efforts of your digital advertising.
Once you have finalized setting each goal up in Tag Manager and Analytics, you’ll need to login to your Google Ads account and navigate to the Conversion section. From here, click the circular blue + button in the top-left of the page to add a new conversion. On the next page, click the Import option and choose to import goals from Google Analytics. This will provide you with a list of goals that you can import from your Analytics account into your Ads account. Google is now requiring that you apply a Category to each goal that you import, but this is the last step in the process.
With these goals imported, you will now be able to track a variety of goals to determine the success of your digital ads. Be sure to import any new goals that you create in the future.
Continue Your Tag Manager Education
Now that you know the basics of configuring conversion tracking for your bank website, you can begin experimenting with tracking a variety of goals on your own website. If you feel that you might need more information on the subject before you get started, Google offers a free Tag Manager Fundamentals course to help you get a better understanding of how the tool works. This can help you learn new tracking strategies that may be valuable to your bank.
One important thing to keep in mind is that any changes made to your website could cause your pre-existing goals to break, which will prevent you from collecting any new tracking data until they are fixed. For example, if you change core providers and the link on your website to the online account opening portal changes, you will need to adjust this in Tag Manager as well.
Need Help Tracking Conversions on Your Bank Website?
If you need additional support, consider partnering with a digital marketing agency that has extensive experience in this realm. They can help you begin tracking a variety of new goals that can give you greater insight into your website usage – such as video views, form submissions, and much more. This information gives greater credence to your internal marketing reports and provides the knowledge you need to turn your bank website into a proper lead-generation tool.

